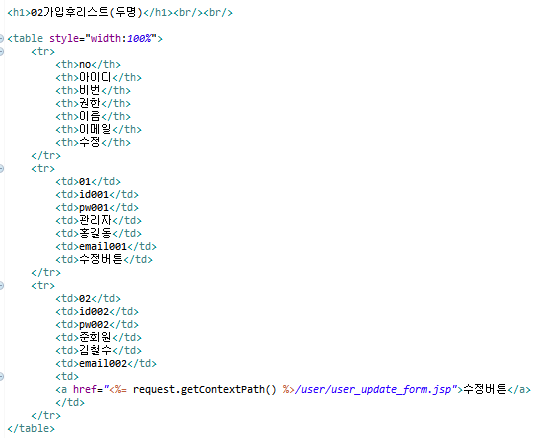
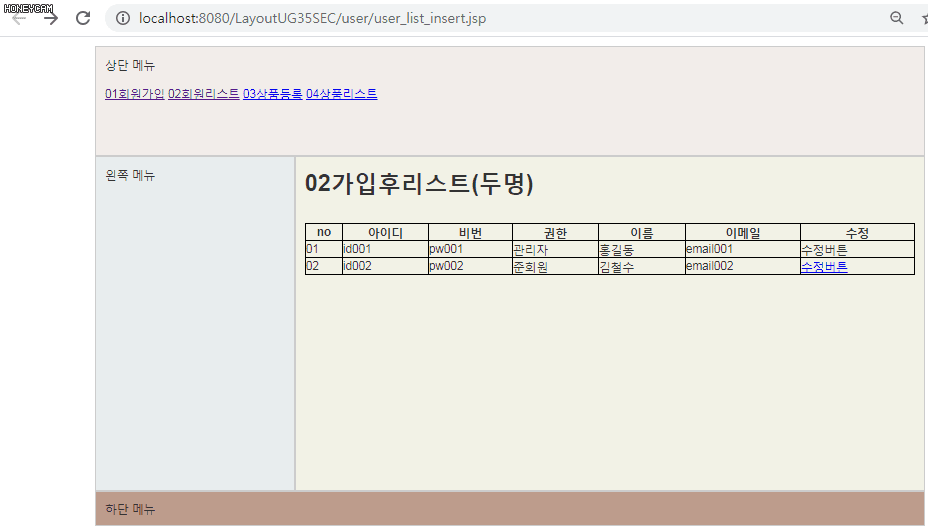
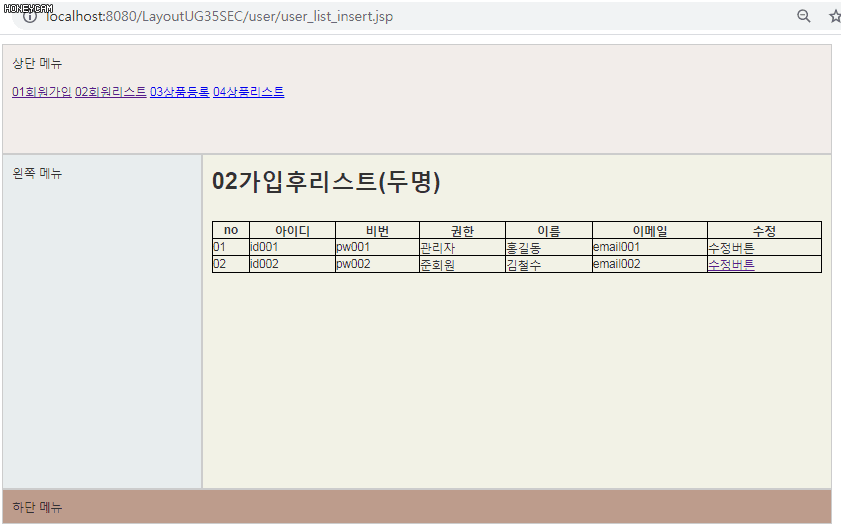
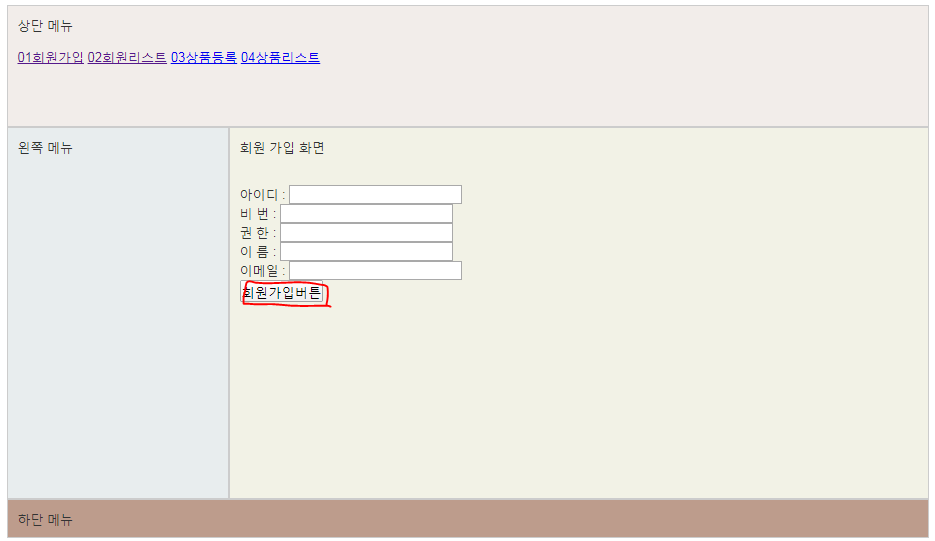
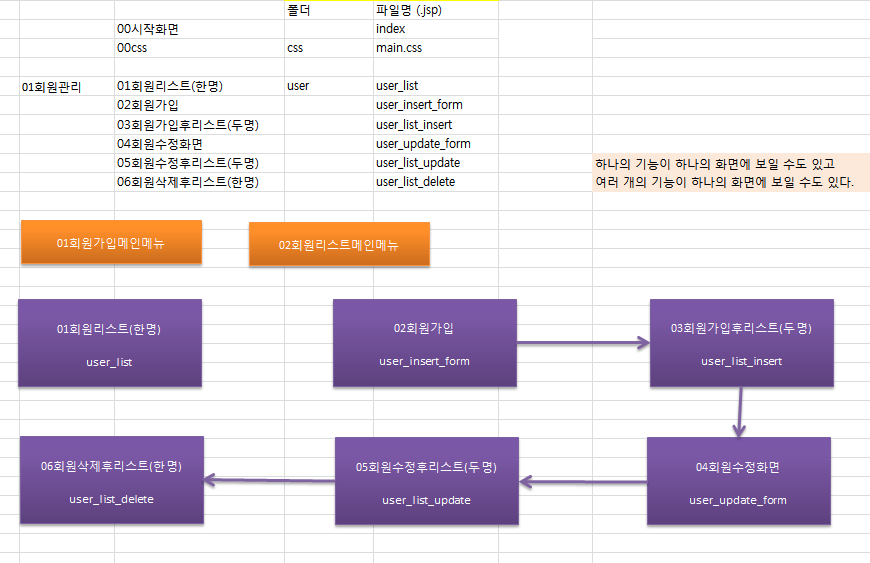
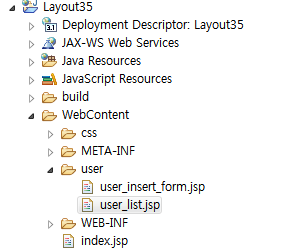
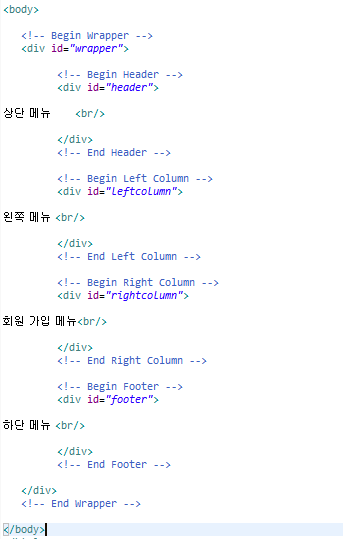
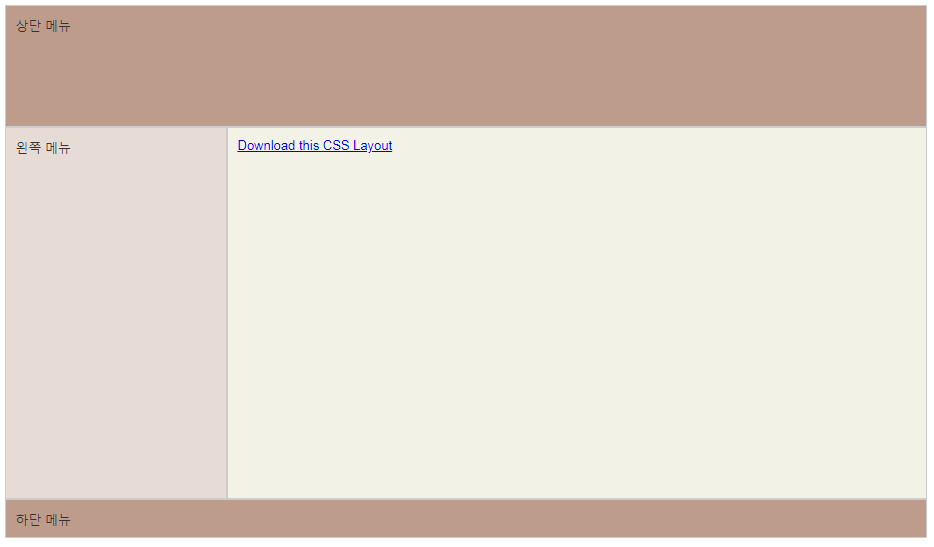
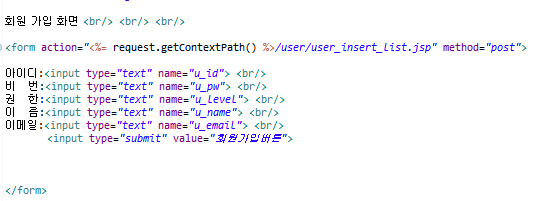
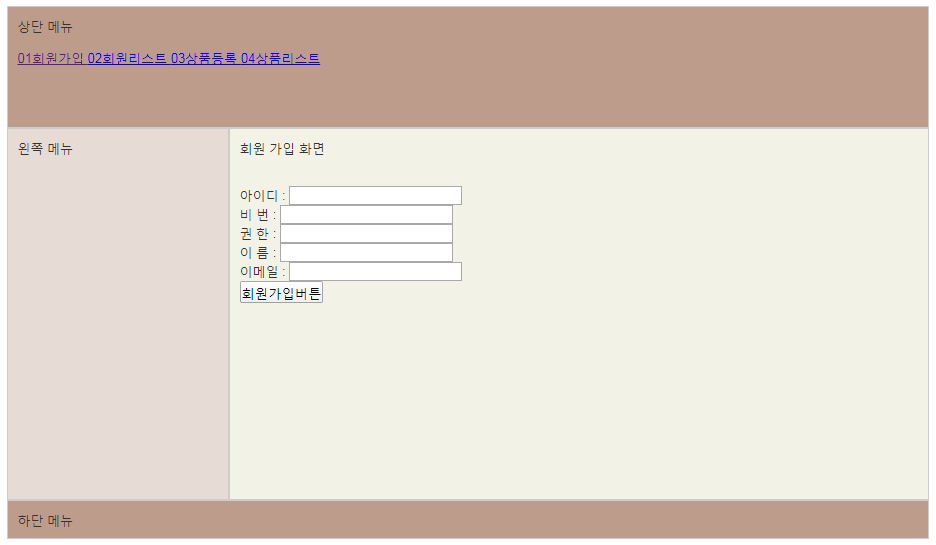
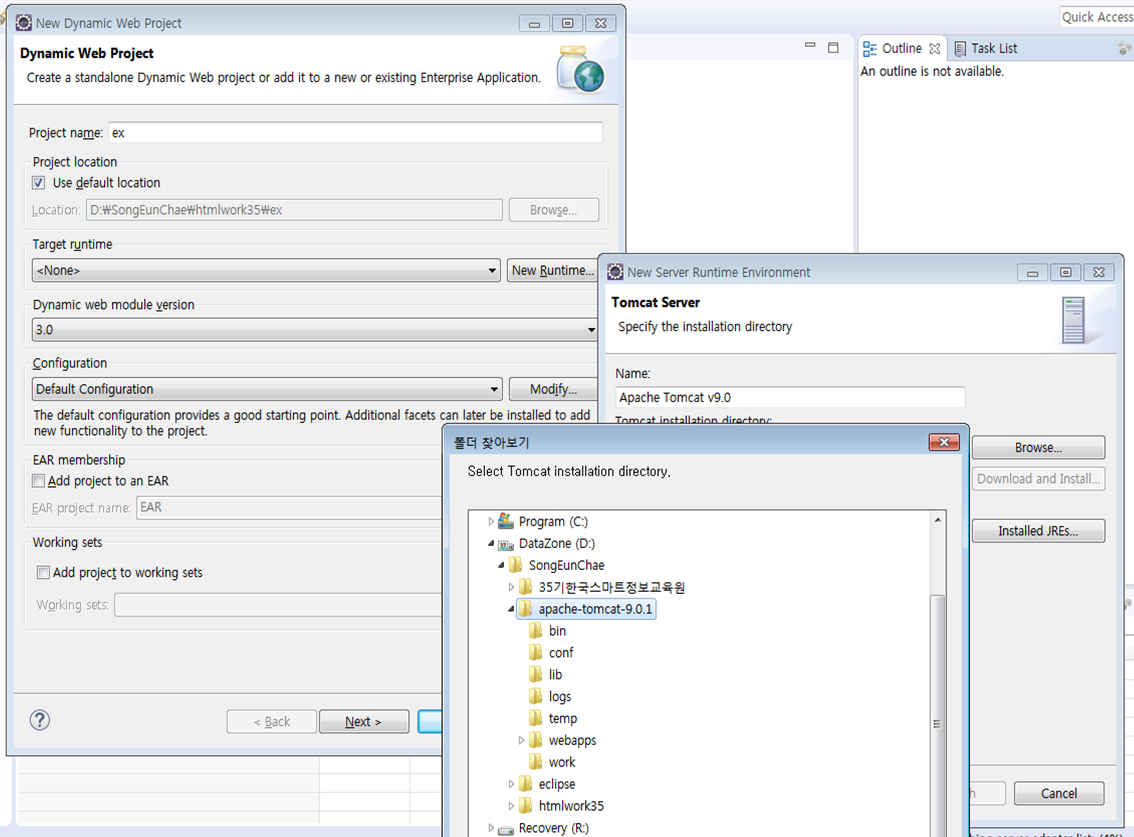
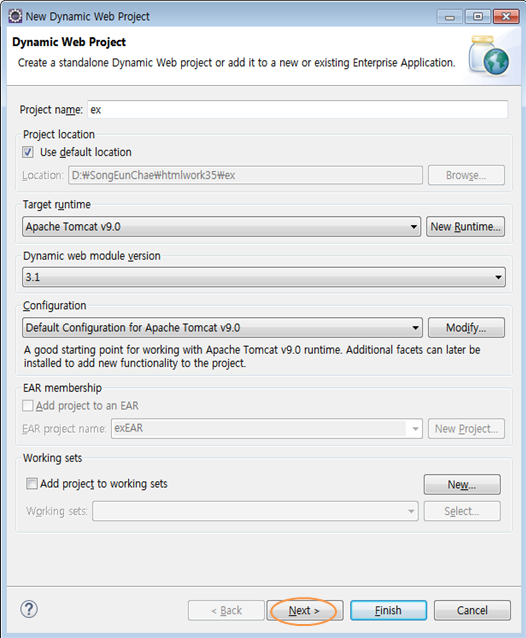
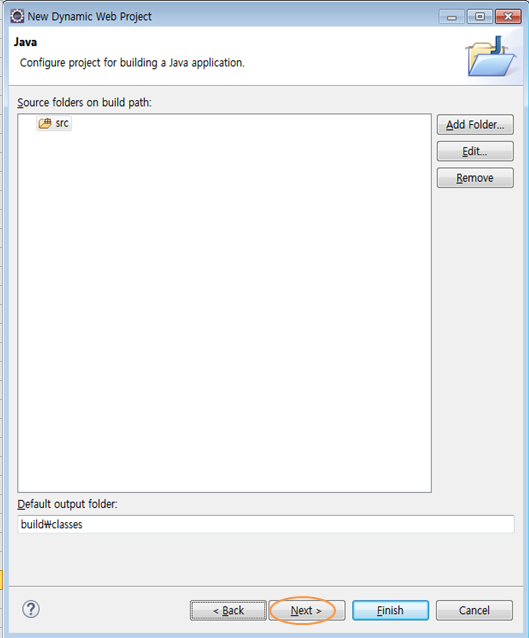
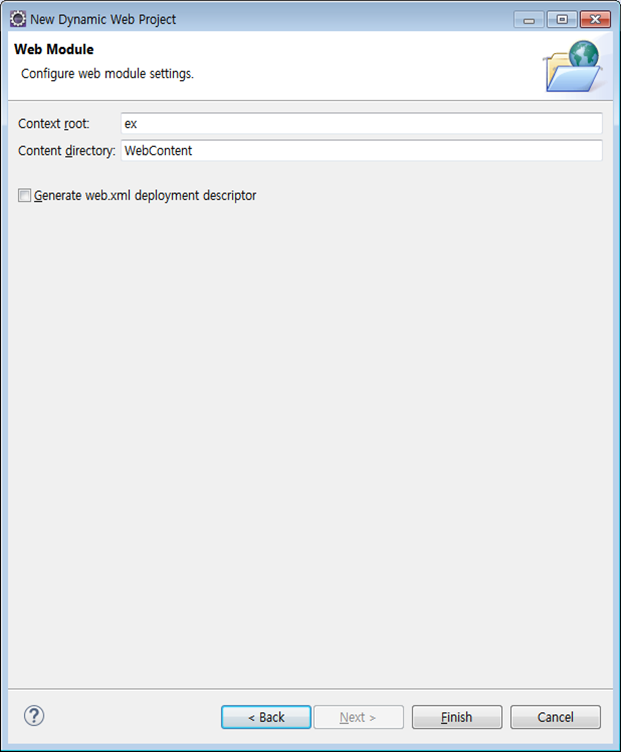
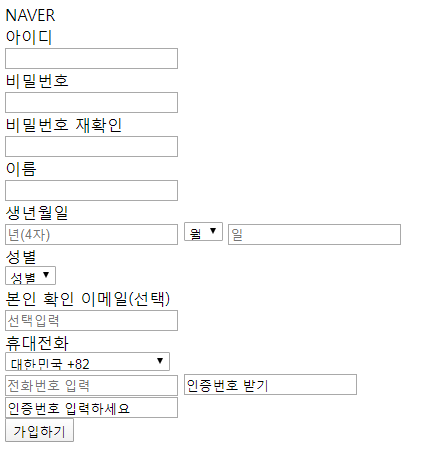
1. NAVER 회원가입 화면 (폼)
<!DOCTYPE html>
<html>
<head>
<meta charset="UTF-8">
<title>회원가입</title>
</head>
<body>
<!--
###################################################
실습1. 네이버의 회원가입폼과 유사하게 태그를 구성하여 회원가입폼을 완성하고,
joinProcess.jsp파일에 데이터를 전송하여 출력하시오.
###################################################
-->
<div>
NAVER
</div>
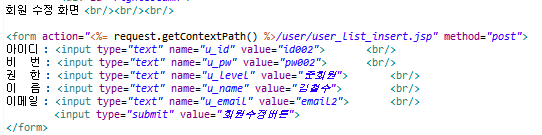
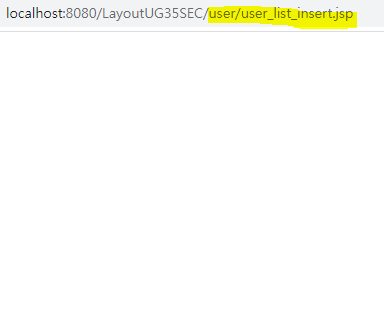
<form action="./joinProcess.jsp" method="post">
<div>
아이디
<div>
<label>
<input type="text" name="id" value="" >
</label>
</div>
</div>
<div>
비밀번호
<div>
<label>
<input type="password" name="pw" value="" >
</label>
</div>
</div>
<div>
비밀번호 재확인
<div>
<label>
<input type="password" name="confirmPw" value="" >
</label>
</div>
</div>
<div>
이름
<div>
<label>
<input type="text" name="name" value="" >
</label>
</div>
</div>
<div>
생년월일
<div>
<label>
<input type="text" name="year" value="" placeholder="년(4자)" >
<select name="month" >
<option value="">월</option>
<option value="1">1</option>
<option value="2">2</option>
<option value="3">3</option>
<option value="4">4</option>
<option value="5">5</option>
<option value="6">6</option>
<option value="7">7</option>
<option value="8">8</option>
<option value="9">9</option>
<option value="10">10</option>
<option value="11">11</option>
<option value="12">12</option>
</select>
<input type="text" name="day" value="" placeholder="일" >
</label>
</div>
</div>
<div>
성별
<div>
<label>
<select name="gender">
<option value="">성별</option>
<option value="m">남자</option>
<option value="f">여자</option>
</select>
</label>
</div>
</div>
<div>
본인 확인 이메일(선택)
<div>
<label>
<input type="text" name="email" value="" placeholder="선택입력">
</label>
</div>
</div>
<div>
휴대전화
<div>
<label>
<select name="nation">
<option value="+505">니카라과+505</option>
<option value="+82" selected="selected">대한민국 +82</option>
<option value="+45">덴마크 +45</option>
<option value="+299">덴마크령그린란드 +299</option>
</select>
</label>
</div>
<div>
<input type="text" name="phone" value="" placeholder="전화번호 입력">
<input type="text" name="checkCode" value="인증번호 받기" readonly="readonly">
</div>
<div>
<input type="text" name="checkCodeWrite" value="인증번호 입력하세요" readonly="readonly">
</div>
</div>
<button>가입하기</button>
</form>
</body>
</html><%@ page language="java" contentType="text/html; charset=UTF-8"
pageEncoding="UTF-8"%>
<%
request.setCharacterEncoding("UTF-8");
String id = request.getParameter("id");
String pw = request.getParameter("pw");
String confirmPw = request.getParameter("confirmPw");
String name = request.getParameter("name");
String year = request.getParameter("year");
String month = request.getParameter("month");
String day = request.getParameter("day");
String gender = request.getParameter("gender");
String email = request.getParameter("email");
String nation = request.getParameter("nation");
String phone = request.getParameter("phone");
out.println(id);
out.println(pw);
out.println(confirmPw);
out.println(name);
out.println(year);
out.println(month);
out.println(day);
out.println(gender);
out.println(email);
out.println(nation);
out.println(phone);
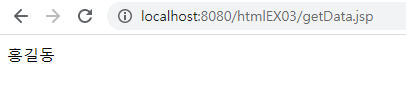
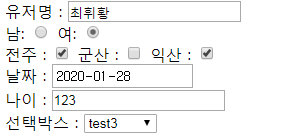
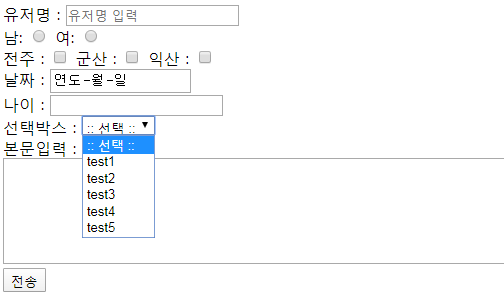
%>폼출력
입력
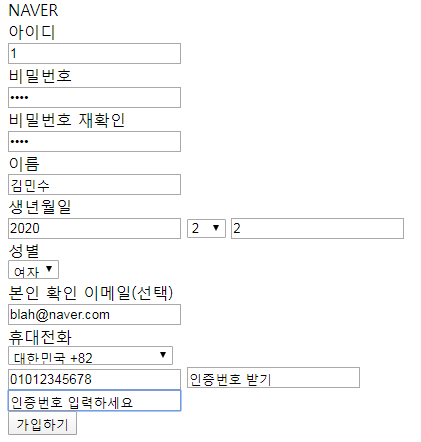
데이터 전송 출력

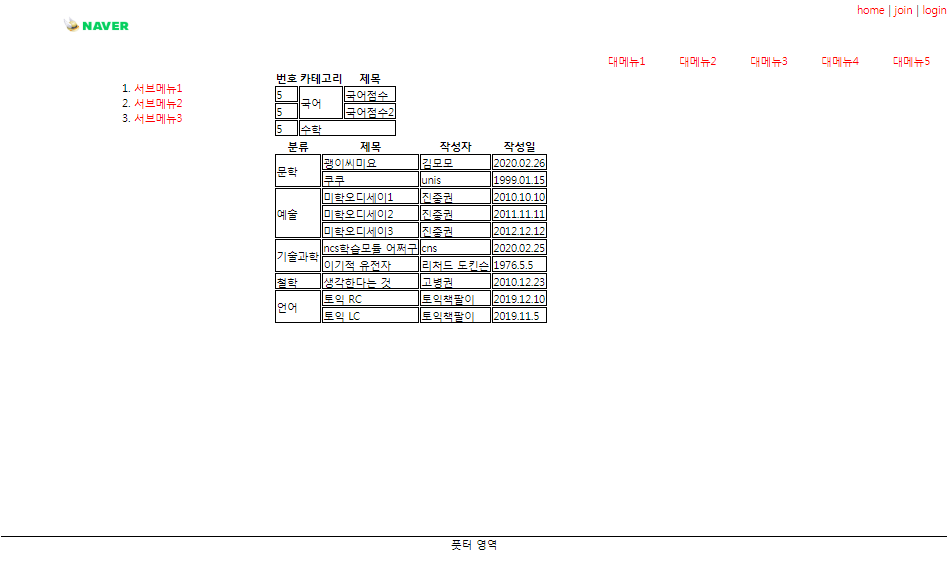
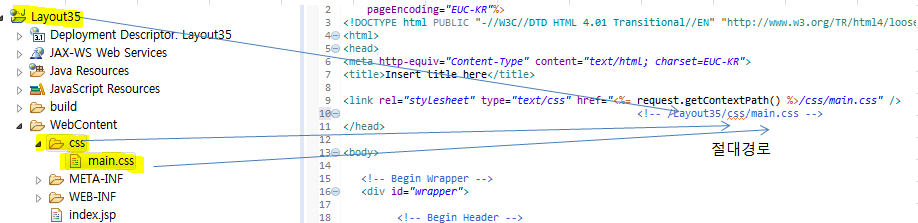
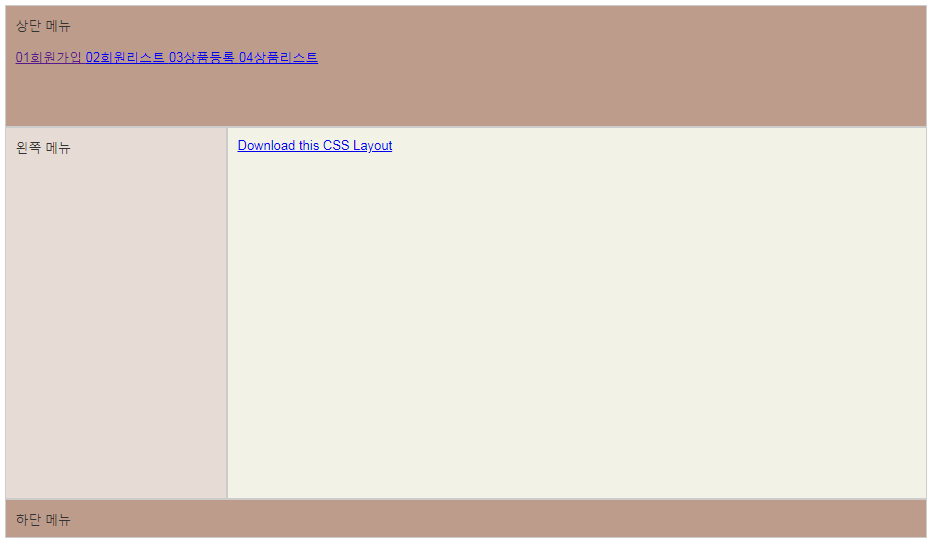
2.네이버 로그인 화면 (레이아웃과 폼)
<!DOCTYPE html>
<html>
<head>
<meta charset="UTF-8">
	<link href="./resource/css/common.css" rel="stylesheet">

<title>로그인</title>
</head>
<body>
	<!--
		###################################################
		실습2. naver.com의 로그인 페이지를 유사하게 구성 (html, css)하고
		로그인버튼 클릭시 loginProcess.jsp에 데이터를 전송하고 출력하시오.
		###################################################
	 -->
	<header>
		<div id=lang>
			<label>
				<select name="lang">
						<option value="ko-KR">한국어</option>
						<option value="en-US">English</option>
						<option value="CN">中文(简体)</option>
						<option value="TW">中文(台灣)</option>
				</select>
			</label>
		</div>

	</header>


	<div id=content>

		<div id=logo>
			<label>
				<a href="#"><img src="./resource/img/NAVER_CI_Green.png" alt="naver"></a>
			</label>
		</div>

		<form action="./loginProcess.jsp" method="post">
			<div id=id>
				<label>
					<input type="text" name="uId" placeholder="아이디">
				</label>
			</div>
			<div id=pw>
				<label>
					<input type="password" name="uPw" placeholder="비밀번호">
				</label>
			</div>
			<div id=button>
				<label>
					<button type="submit">로그인</button>
				</label>
			</div>
			<div id=logip>
				<div>
					<label id=log-sta>
						<input type="checkbox" name="logSta" value="로그인 상태 유지" > 로그인 상태 유지
					</label>
				</div>
				<div id=ip-check>
					<label>
						<a id=ip href="#">IP보안</a>
						<a id=on-off href="#">ON</a>
					</label>
					<label id=secue>
						<a id=secu-t href="#">일회용 로그인</a>
					</label>
				</div>
			</div>
		</form>
	</div>


	<footer id=footer>
		<div id=find-info>
			<label>
				<a href="#">아이디 찾기</a>
				 |
				<a href="#">비밀번호 찾기</a>
				 |
				<a href="#">회원가입</a>
			</label>
		</div>


	</footer>

	<div id=banner>
		<label>
			<img src="./resource/img/banner.png" alt="banner">
		</label>
	</div>


</body>
</html>
@charset "UTF-8";
<style type="text/css">
div {
margin: 0; padding: 0; font-size: 13px; color: #2e2e2e;
}
body{background-color: #F5F6F7;}
header {margin: 10px 5px 50px 5px; float: right;}
#content {clear:both; width:70%; margin:0 auto; text-align: center;}
#logo {margin: 50px;}
#logo label img {height: 45px;}
#id, #pw, #button {margin: 15px;}
#id label input {width: 400px; height: 50px;}
#pw label input {width: 400px; height: 50px;}
#button label button {width: 400px; height: 50px; background-color:#02C850; border: 0; color: #fff;}
#logip {width: 400px; margin: 0 auto;}
#ip-check {float: right;}
#ip-check label a{font-size: 13px;}
#ip, #on-off, #secu-t {text-decoration: none;}
#ip, #secue {color:#5D5D5D;}
#on-off {font-weight: bold ; color:#02C850;}
#secue {float: right; margin: 0 10px;}
#secu-t {text-decoration: underline; color:#5D5D5D;}
#secu-t:hover{color:#5D5D5D;}
#log-sta {float: left; font-size: 13px;}
#footer {width: 400px; margin: 50px auto 0 auto; padding: 15px; clear: both; text-align: center; border-top: 1px solid #2e2e2e; border-color: #CFCFCF; }
#find-info label a{color:#5D5D5D; text-decoration: none;font-size: 13px;}
#banner {text-align: center;}
#banner label img{padding: 50px 0;}
</style>
<%@ page language="java" contentType="text/html; charset=UTF-8"
pageEncoding="UTF-8"%>
<%
request.setCharacterEncoding("UTF-8");
String uId= request.getParameter("uId");
String uPw= request.getParameter("uPw");
String logSta= request.getParameter("logSta");
out.println(uId);
out.println(uPw);
if(logSta != null){out.println("로그인 유지");}
else {out.println("로그인 유지하지 않음");}
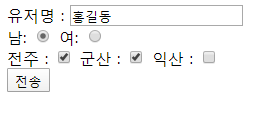
%>완성된 화면
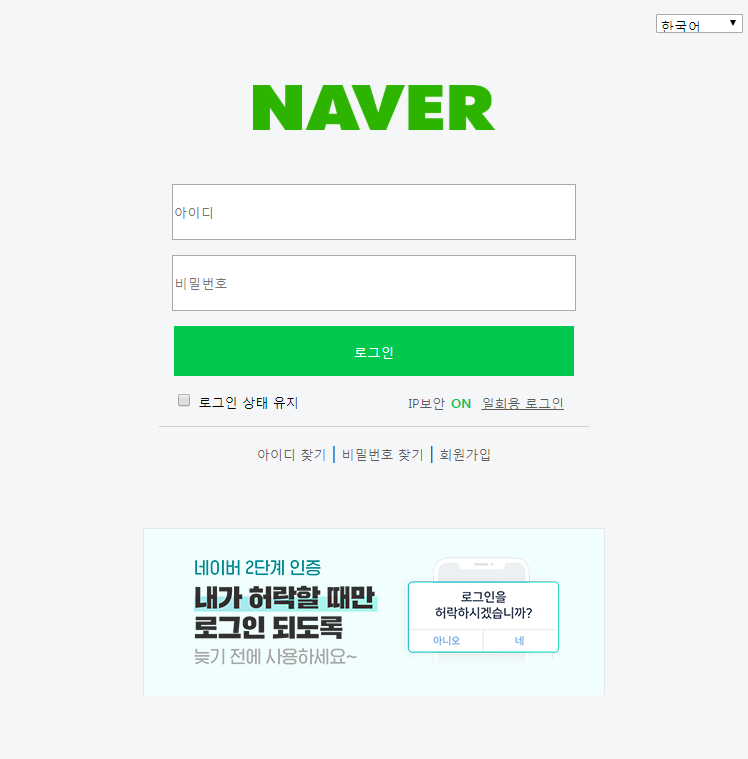
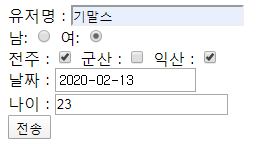
데이터 전송 test 1

↓

데이터 전송 test 2
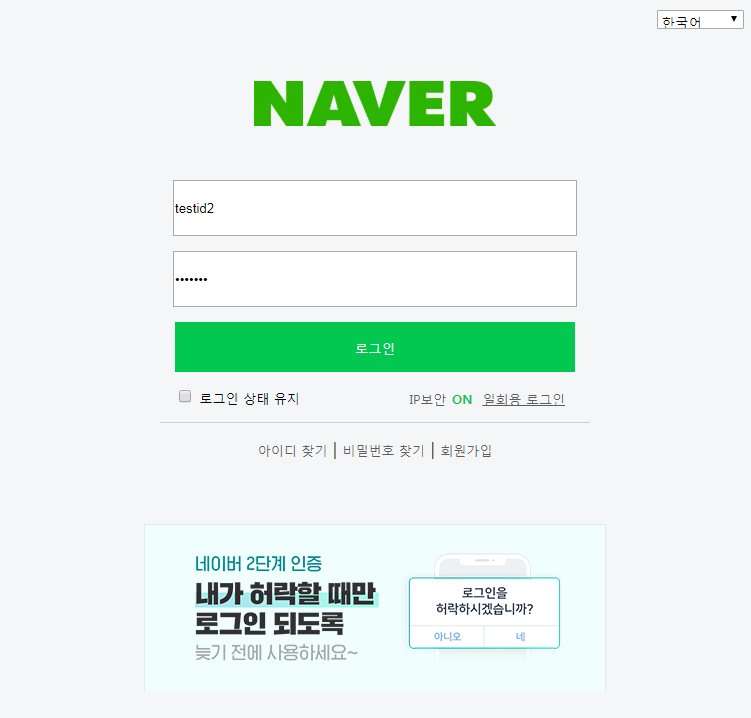
↓

<!DOCTYPE html>
<html>
<head>
<meta charset="UTF-8">
<title>로그인</title>

<style type="text/css">
	body{padding: 0; margin: 0; background-color: #f5f6f7;}
	input, button{padding: 0; margin: 0;  line-height: 50px; width: 100%;}
	#container{width: 460px; margin: 62px auto 0 auto;}
	#logo { text-align: center; margin-bottom: 70px;}
	#logo img{width: 231px;}
	.input-wrap {margin-bottom: 20px;}
	.input-wrap input{}
	#login-btn button{background-color: #03c75a; color:#fff; font-size: 15px; border: 2px solid #03c75a;}
	#content{padding-bottom:50px ; border-bottom: 1px solid #e4e4e5;}
	#footer{text-align: center; padding-top: 20px;}
</style>

</head>
<body>
	<div id="container">
		<div id="logo">
			<img src="./resource/img/NAVER_CI_Green.png">
		</div>
		<div id="content">
			<form action="./loginProcessT.jsp" method="post">
				<div class="input-wrap">
					<input type="text" name="id" placeholder="아이디">
				</div>
				<div class="input-wrap">
					<input type="text" name="pw" placeholder="패스워드">
				</div>
				<div id="login-btn">
					<button type="submit">로그인</button>
				</div>
			</form>
		</div>
		<div id="footer">
			아이디 찾기 | 비밀번호 찾기 | 회원가입
		</div>
	</div>
</body>
</html>
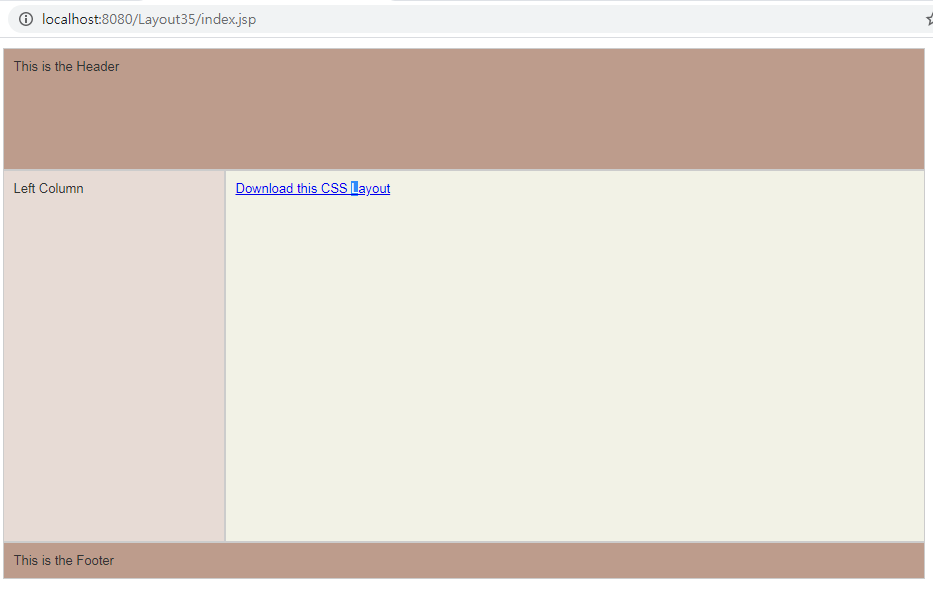
레이아웃 큰 틀부터 잡고 차근차근!
html부터 작성하고 css에서 style을 주려고 하면 꼬일 수 있음
'UI/UX엔지니어링 > UI구현' 카테고리의 다른 글
| Form Tag (0) | 2020.02.28 |
|---|---|
| Block element/Inline element/Merge Cells (0) | 2020.02.27 |
| 전세계에서 가장 멋 없는 레이아웃 실습 ③ (0) | 2020.02.19 |
| 전세계에서 가장 멋 없는 레이아웃 실습 ② (0) | 2020.02.19 |